목차
1. 상품 상세
2. 상품 등록 폼
3. 상품 등록 처리(PRG)
4. 상품 수정 폼
5. 상품 수정

도메인
Item.class
package spring.mvc.web.domain;

import lombok.Data;

@Data
public class Item {
    private long id;
    private String itemName;
    private Integer price;
    private Integer quantity;

    public Item() {

    }

    public Item(String itemName, Integer price, Integer quantity) {
        this.itemName = itemName;
        this.price = price;
        this.quantity = quantity;
    }
}
Book.class
package spring.mvc.web.domain;

import lombok.Data;

@Data
public class Book extends Item {
    public String dataType;

    public Book(String itemName, Integer price, Integer quantity, String dataType) {
        super(itemName, price, quantity);
        this.dataType = dataType;
    }

}
상품 상세
과정) 상품 클릭시 basic/items/{item.id}로 이동 -> 핸들러가 모델에 데이터를 담고 basic/item으로 뷰 이동
basic/items.html
<!DOCTYPE HTML>
<html xmlns:th="http://www.thymeleaf.org">
<head>
    <meta charset="utf-8">
    <link th:href="@{/css/bootstrap.css}"
          href="../css/bootstrap.css" rel="stylesheet">
</head>
<body>

<div class="container" style="max-width: 600px">
    <div class="py-3 bg-primary text-center text-white">
        <h2>Steady Kim Shop</h2>
    </div>
    <div class="py-2 text-center">
        <h3>상품 목록</h3>
    </div>
    <div class="row">
        <div class="col">
            <button class="btn btn-secondary float-end"
                    onclick="location.href='addForm.html'"
                    th:onclick="|location.href='@{/basic/items/add}'|"
                    type="button">상품
                등록</button>
        </div>
    </div>
    <hr class="my-4">
    <div>
        <table class="table">
            <thead>
            <tr>
                <th>ID</th>
                <th>상품명</th>
                <th>품목</th>
                <th>가격</th>
                <th>수량</th>
            </tr>
            </thead>
            <tbody>
            <tr th:each="item : ${items}">
                <td><a href="item.html" th:href="@{/basic/items/{itemId}(itemId=${item.id})}"  th:text="${item.id}">회원id</a></td>
                <td><a href="item.html" th:href="@{|/basic/items/${item.id}|}" th:text="${item.itemName}">상품명</a></td>
                <td th:text="${item.dataType}">아이템 종류</a></td>
                <td th:text="${item.price}">10000</td>
                <td th:text="${item.quantity}">10</td>
            </tr>

            </tbody>
        </table>
    </div>
</div> <!-- /container -->
</body>
</html>
1. 클릭시 basic/items/{item.id}로 이동하기 위해 th:href를 사용하였다.
한편, th:text를 통해 모델로 받은 item객체의 값들을 활용해 매핑해고 있다.
<td><a href="item.html" th:href="@{/basic/items/{itemId}(itemId=${item.id})}"  th:text="${item.id}">회원id</a></td>
<td><a href="item.html" th:href="@{|/basic/items/${item.id}|}" th:text="${item.itemName}">상품명</a></td>
2. 클릭하면 basic/items/{item.id}로 url 요청이 가는데 이를 핸들링 하기 위해 아래의 컨트롤러가 존재한다. model에 데이터를 담는다.
    @GetMapping("{itemId}")
    public String item(@PathVariable long itemId, Model model) {
        Item foundItem = itemRepository.findById(itemId);
        model.addAttribute("item", foundItem);

        return "basic/item";
    }
1. @PathVariable을 통해 {itemId}를 받는다.
2. 받은 itemId를 키로 foundItem을 찾는다.
3. model에 담아 basic/item으로 뷰 dispatch한다.
basic/item.html
<!DOCTYPE html>
<html xmlns:th="http://www.thymeleaf.org">
<head>
    <meta charset="utf-8">
    <link th:href="@{/css/bootstrap.css}"
          href="../css/bootstrap.css" rel="stylesheet">
</head>
<body>
<!--상부 컨테이너-->
<div class="container" style="max-width: 600px">
    <div class="py-3 bg-primary text-center text-white">
        <h2>Steady Kim Shop</h2>
    </div>

    <div class="py-2 text-center">
        <h3>상품 상세 </h3>
    </div>
    <!-- 상품 상세 내용-->
    <div class="text-center" >
        <label class="bg-secondary text-white" for="itemId" style="width: 300px">상품 ID</label>
        <p id="itemId" name="itemId" th:text="${item.id}">1</p>

        <label class="bg-secondary text-white" for="itemName" style="width: 300px">상품 이름</label>
        <p id="itemName" name="itemName" th:text="${item.itemName}">itemName</p>

        <label class="bg-secondary text-white" for="dataType" style="width: 300px">품목</label>
        <p id="dataType" name="dataType" th:text="${item.dataType}">품목</p>

        <label class="bg-secondary text-white" for="itemPrice" style="width: 300px">가격</label>
        <p id="itemPrice" name="itemPrice" th:text="${item.price}">1</p>

        <label class="bg-secondary text-white" for="itemQuantity" style="width: 300px">수량</label>
        <p id="itemQuantity" name="itemQuantity" th:text="${item.quantity}">수량</p>
    </div>
    <hr class="my-4">
    <div class="row">
        <div class="col text-center">
            <button class="w-50 btn btn-primary btn-lg"
                    th:onclick="|location.href='@{/basic/items/{itemId}/edit(itemId=${item.id})}'|"
                    type="button">상품 수정</button>
        </div>
        <div class="col">
            <button class="w-50 btn btn-secondary btn-lg"
                    th:onclick="|location.href='@{/basic/items}'|"
                    type="button">목록으로</button>
        </div>
    </div>
</div> <!--/container -->
</body>
</html>
1. item의 속성들이 동적으로 mapping된다.
상품 등록 폼
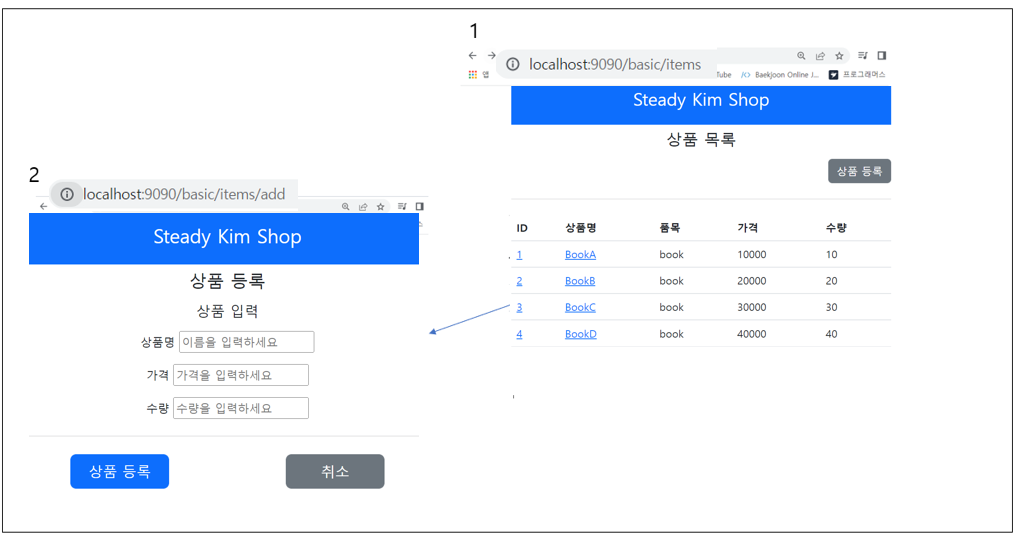
과정) 상품 등록 클릭시 basic/items/add 이동 -> 컨트롤러가 addForm.html로 뷰 이동
1. 상품 등록 클릭시 basic/items/add 로 가도록 설계한다.
<button class="btn btn-secondary float-end"
            onclick="location.href='addForm.html'"
            th:onclick="|location.href='@{/basic/items/add}'|"
            type="button">상품 등록</button>
2. 해당 url을 받는 컨트롤러를 생성한다. basic/addForm으로 이동한다.
@Controller
@RequestMapping("/basic/items")
@RequiredArgsConstructor
public class BasicItemController {

    @GetMapping("/add")
    public String addForm() {
        return "basic/addForm";
 }
}
basic/addForm.html
<!DOCTYPE html>
<html xmlns:th="http://www.thymeleaf.org">
<head>
    <meta charset="utf-8">
    <link th:href="@{/css/bootstrap.css}"
          href="../css/bootstrap.css" rel="stylesheet">
</head>
<body>
<!--상부 컨테이너-->
<div class="container" style="max-width: 600px">
    <div class="py-3 bg-primary text-center text-white">
        <h2>Steady Kim Shop</h2>
    </div>

    <div class="py-2 text-center">
        <h3>상품 등록 </h3>
    </div>

    <!-- 상품 상세 내용-->
    <div class="text-center">
        <h5 class="mb-3">상품 입력</h5>
        <form th:action method="post">
            <div class="my-3">
                <label form="itemName">상품명</label>
                <input type="text" id="itemName" name="itemName" placeholder="이름을 입력하세요">
            </div>
            <div class="my-3">
                <label form="price">가격</label>
                <input type="text" id="price" name="price" placeholder="가격을 입력하세요">
            </div>
            <div class="my-3">
                <label form="quantity">수량</label>
                <input type="text" id="quantity" name="quantity" placeholder="수량을 입력하세요">
            </div>

            <hr class="my-4">
            <div class="row">
                <div class="col text-center">
                    <button class="w-50 btn btn-primary btn-lg"
                            th:onclick="|location.href='@{/basic/items/add)}'|"
                            type="submit">상품 등록</button>
                </div>
                <div class="col text-center">
                    <button class="w-50 btn btn-secondary btn-lg"
                            th:onclick="|location.href='@{/basic/items}'|"
                            type="button">취소</button>
                </div>
            </div>
        </form>
    </div>
</div> <!--/container -->
</body>
</html>
상품 등록 처리
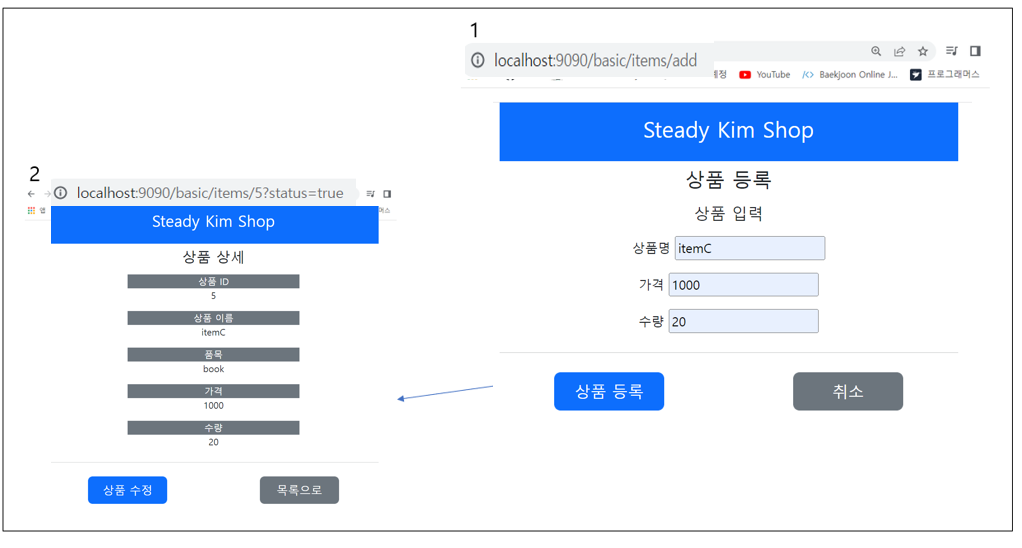
과정) 상품 등록 클릭 같은 url로 post요청 -> 같은 Url을 Post Controller가 핸들링 -> 상품 상세페이지로 redirect 이동
1) 상품 등록 form이 있는 addForm.html의 일부 발췌
<form th:action method="post">
    <div class="my-3">
        <label form="itemName">상품명</label>
        <input type="text" id="itemName" name="itemName" placeholder="이름을 입력하세요">
    </div>
    <div class="my-3">
        <label form="price">가격</label>
        <input type="text" id="price" name="price" placeholder="가격을 입력하세요">
    </div>
    <div class="my-3">
        <label form="quantity">수량</label>
        <input type="text" id="quantity" name="quantity" placeholder="수량을 입력하세요">
    </div>

    <hr class="my-4">
    <div class="row">
        <div class="col text-center">
            <button class="w-50 btn btn-primary btn-lg"
                    th:onclick="|location.href='@{/basic/items/add)}'|"
                    type="submit">상품 등록</button>
        </div>
        <div class="col text-center">
            <button class="w-50 btn btn-secondary btn-lg"
                    th:onclick="|location.href='@{/basic/items}'|"
                    type="button">취소</button>
        </div>
    </div>
</form>
basic/addForm.html 에 상품 등록 관련 코드
<form th:action method="post">같은 url에 POST요청을 보낸다.
2) RequestParam 사용한 POST Controller
    @PostMapping("/add")
    public String addItem(@RequestParam("itemName") String itemName,
                          @RequestParam("price") Integer itemPrice,
                          @RequestParam("quantity") Integer itemQuantity,
                          RedirectAttributes redirectAttributes) {

        Book book = new Book(itemName, itemPrice, itemQuantity, ItemName.BOOK);
        Item savedItem = itemRepository.save(book);

        redirectAttributes.addAttribute("itemId", savedItem.getId());
        redirectAttributes.addAttribute("status", true);

        return "redirect:/basic/items/{itemId}";
    }
1. post에 받은 데이터를 @RequestParam을 통해 받는다.
2. basic/items/{itemId}로 redirect한다.
한편 ModelAttribute도 가능한데, 특징은 아래와 같다.
클래스 이름에서 앞글자 대문자를 소문자로 한다. Item -> item
@ModelAttribute는 요청 파라미터를 처리하기도 하고, Model에 자동으로 객체를 추가하는 처리도 한다.
상품 수정 폼
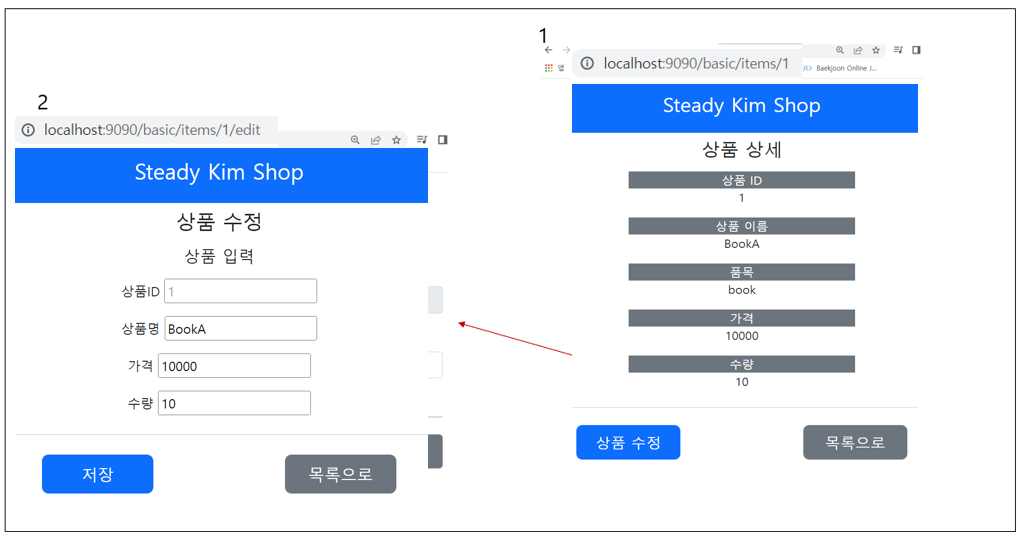
과정) 상품 수정 클릭시 ->basic/items/{itemId}/edit으로 이동 -> Controller가 basic/editForm 뿌려줌
1) basic/item.html의 일부분
    <div class="row">
        <div class="col text-center">
            <button class="w-50 btn btn-primary btn-lg"
                    th:onclick="|location.href='@{/basic/items/{itemId}/edit(itemId=${item.id})}'|"
                    type="button">상품 수정</button>
        </div>
        <div class="col text-center" >
            <button class="w-50 btn btn-secondary btn-lg"
                    th:onclick="|location.href='@{/basic/items}'|"
                    type="button">목록으로</button>
        </div>
    </div>
1. 기존에 item.html로 뷰 이동을 할 때 item 객체의 정보를 가지고 있었으므로, 수정에서도 그 정보인 itemId를 활용한다.
2) 상품 수정 폼 이동 Controller
    @GetMapping("/{itemId}/edit")
    public String editForm(@PathVariable("itemId") long id, Model model) {
        Item foundItem = itemRepository.findById(id);

        model.addAttribute("item", foundItem);
        return "basic/editForm";
    }
3) editForm.html
<!DOCTYPE html>
<html xmlns:th="http://www.thymeleaf.org">
<head>
    <meta charset="UTF-8">
    <title>Title</title>
    <link th:href="@{/css/bootstrap.css}"
          href="../css/bootstrap.css" rel="stylesheet">
</head>
<body>
<!--상부 컨테이너-->
<div class="container" style="max-width: 600px">
    <div class="py-3 bg-primary text-center text-white">
        <h2>Steady Kim Shop</h2>
    </div>

    <div class="py-2 text-center">
        <h3>상품 수정 </h3>
    </div>

    <!-- 상품 상세 내용-->
    <div class="text-center">
        <h5 class="mb-3">상품 입력</h5>
        <form th:action method="post">
            <div class="my-3">
                <label form="id">상품ID</label>
                <input style="color: #9e9e9e" type="text" id="id" name="id" th:value="${item.id}" readonly>
            </div>

            <div class="my-3">
                <label form="itemName">상품명</label>
                <input type="text" id="itemName" name="itemName" th:value="${item.itemName}">
            </div>
            <div class="my-3">
                <label form="price">가격</label>
                <input type="text" id="price" name="price" th:value="${item.price}">
            </div>
            <div class="my-3">
                <label form="quantity">수량</label>
                <input type="text" id="quantity" name="quantity" th:value="${item.quantity}">
            </div>

            <hr class="my-4">
            <div class="row">
                <div class="col text-center">
                    <button class="w-50 btn btn-primary btn-lg" type="submit">저장</button>
                </div>
                <div class="col text-center">
                    <button class="w-50 btn btn-secondary btn-lg"
                            th:onclick="|location.href='@{/basic/items/{itemId}(itemId=${item.id})}'|"
                            type="button">목록으로</button>
                </div>
            </div>
        </form>
    </div>
</div><!--/상부 컨테이너-->
</body>
</html>
1. 상품 수정폼으로 이동시 th:value를 활용하여 넘어온 데이터의 속성들을 매핑해준다.
상품 수정
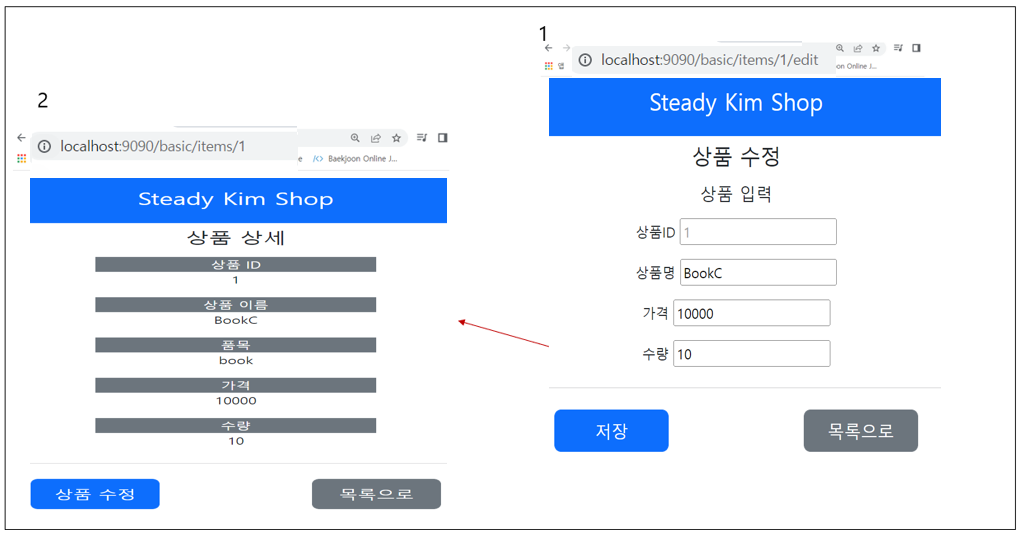
과정) 저장버튼 누르면 -> Post로 같은 url에 데이터를 넘긴다. -> Post Controller가 받아서 수정 로직을 실행하고, basic/items/{itemId}로 redirect 이동한다.
1) 저장버튼
<form action="item.html" th:action method="post">
<button class="w-100 btn btn-primary btn-lg" type="submit">저장</button>
</form>
1저장버튼 누르면 -> Post로 같은 url에 item 객체 데이터를 넘긴다.
2) PostController
@PostMapping("/{itemId}/edit")
public String edit(@PathVariable("itemId") long itemId,
                   @RequestParam("itemName") String itemName,
                   @RequestParam("price") Integer itemPrice,
                   @RequestParam("quantity") Integer itemQuantity,
                   Model model) {


    Book book = new Book(itemName, itemPrice, itemQuantity, ItemName.BOOK);

    itemRepository.update(itemId, book);

    return "redirect:/basic/items/{itemId}";
}
1. Post Controller가 받아서 수정 로직을 실행하고, basic/items/{itemId}로 redirect 이동한다.
본 포스팅은 김영한님 인프런 강의내용을 바탕으로 복습을 위해 작성하였습니다. 강의를 통해 배운 개념을 바탕으로 추가적으로 공부한 부분과 간단한 코드 예제를 작성하였습니다. 코드 전체를 복사한 것이 아니라 임의로 수정하거나 생략하였습니다.
'백엔드 > Spring' 카테고리의 다른 글
| [Spring] 디렉터리 패키지 구조 구성하는 방법 (0) | 2023.03.13 |
|---|---|
| [Spring] JSP 대신 Thymeleaf를 사용하는 이유 (0) | 2022.08.22 |
| [Spring] 타임리프 실습 (0) | 2022.07.26 |
| [Spring] 스프링 HTTP 응답 하기 (0) | 2022.07.22 |
| [Spring] 스프링 HTTP 요청 받기 (0) | 2022.07.22 |